| Instructions |
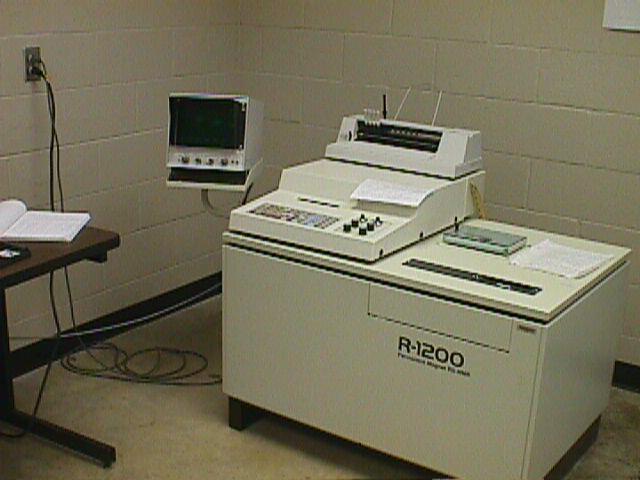
NMR spectrometer
|

Procedure for Obtaining an NMR Spectrum
 1. Sign
log book.
1. Sign
log book.
2. Turn on power to the oscilloscope.
3. Turn on spinner air by turning on the toggle switch in the front
panel above the R-1200 logo.
4. Wipe off the TMS sample, place in the spinner (white plastic), adjust
height and lower it into the probe.
5. Press RESET button ontop control panel of the NMR.
6. Adjust Field Shift knob (or Wide Shift knob if necessary)
to get TMS signal at 0. The chloroform signal will be at 7.5 .
7. Press AUTO RES button or turn resolution knob until the TMS
peak has ringing. 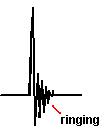
You will hear a beep when ready.
8. Remove the TMS sample and place the spinner on your sample.
Lower the sample into the probe.
9. If the signal is weak, increase the amplitude from 8 to 10.
(press AMPLITUDE, enter the number, and press ENTER.)
10. Set the number of scans to 5. (press No. of Scans,
5, ENTER.)
11. Hold the ACQ. key in and press ACQ. START/STOP, and
then press CORR.
12. To plot and integrate your spectrum
- Use the Procedure to plot NMR spectra (listed
below line) using the ink jet printer on the computer using
GRAMS Version 1.01 - written by Dr. Mike Panigot (June 28, 2000).
13. When finished with the NMR (including spectrum), push RESET
button to remove acquired spectrum from the screen of the oscilloscope.
14. Remove sample from the probe. Remove spinner and placed it
in the sample compartment. Close the sample compartment door. Turn
off spinner air
15. Turn off the oscilloscope.
Procedure to plot NMR spectra using the ink
jet printer on the computer using GRAMS Version 1.01 - written by Dr. Mike
Panigot (June 28, 2000).
1. Open the R-1200 1.0a transfer program by double clicking on its
icon.
2. On menu bar go to Operations and select Transfer File
(this opens a dialog box).
3. In the dialog box, enter your filename (you may use as many letters
as deisred, recommended is 8 letters or fewer as letters beyond 8 are truncated)
and path (usually C:\NMR\DATA\ or C:\NMRDATA) in the Filename
box.
(NOTE 1: your filename path - where the R-1200 program puts
your file and where GRAMS looks for it may be quite different!)
(NOTE 2: do NOT press enter or OK - this simply closes
the box (nothing bad but it is time consuming and a pain). If you
inadvertently close this box, go back to step 2 above and reopen it - it
should have the filename and path you had entered still there).
4. Check that the From R-1200 to PC button is selected.
5. Press Start File Transfer button - the computer will let
you know when file transfer is done and a new window opens inside the R-1200
program.
6. When file transfer is complete, press enter or click the OK
button (closes dialog box).
7. In R-1200 1.0a window, click on Operations on the menu bar
and select Convert to ASCII - a dialog box should open with a From
line with (yourfilename).nmr and a To line with (yourfilename).asp
- if it doesn't check the path.
8. Click on the Convert File button or press enter - when done
a second new window opens.
9. At this point, either close or minimize R-1200 1.0a (minimize may
be preferable if you are running more than one spectrum) and open GRAMS
by double clicking on the Shortcut to GRAMS icon.
10. In GRAMS, under File select Import/ Export (opens
a dialog box for the GRAMS converter files.
11. In the new window, select ASCII for the converter name and
click on the Import button.
12. A box is opened for the filename to enter (check path to make sure
where you saved your file is where GRAMS is looking). Click on your
filename so that it is highlighted and click OK. Note that
double-clicking on the file name does NOT open the file in this instance.
13. A new dialog box opens that has a From box (should have
your filename.asp) and a To box (should have your filename.spc).
Click OK or press enter.
14. At this point, go to File and select Open and find
your file name etc. OR go to File and below Exit there are
four filenames with a number 1, 2, 3, and 4. File 1 should be the
one which you have just converted into a .spc file and you can select it
in that manner.
15. (This step is required for integration, it is NOT if you are just
going to plot the spectrum as it is BUT you can do this in that case as
well) Under Arithmetic select Baseline and in the new
dialog box that opens select Auto Level and click OK or press enter.
16. To plot, under File select Print and check that the
printer is set to print in Landscape mode (preferable to Portrait in this
case - check under Settings in the print dialog box) and print.
17. To integrate spectrum, under Arithmetic select Integrate
- click that what you have is a .spc file (or Real Only) - screen
should go from white background to black background.
18. In new dialog box, select Regions
19. In new dialog box, select Add
20. Place the cursor on the left side (start) of the area to be integrated
and click Right mouse button (screen says left but that does not work).
Repeat for the right side (end) of the area to be integrated.
21. Repeat Step #20 for each region of the spectrum you wish to integrate.
22. Copy the numbers for the integration down - the printer will NOT
print integration.
23. Exit from the Regions dialog box and from the Integration
dialog box - should return to a white background.
24. If you are done with your current sample but have other samples
to run, close the file (under File, select Close and leave
GRAMS open. If you are done and have no additional samples to run,
close GRAMS.
25. Shut down NMR (turn oscilloscope off, turn air off, place all samples
in tray) as indicated for the instructions to that instrument. (see above)
Note: In GRAMS, if at any time the message "No Slots Available" occurs,
under File select Clear All Slots.
CHEM4204
Experiment list
Revised 11/22/02